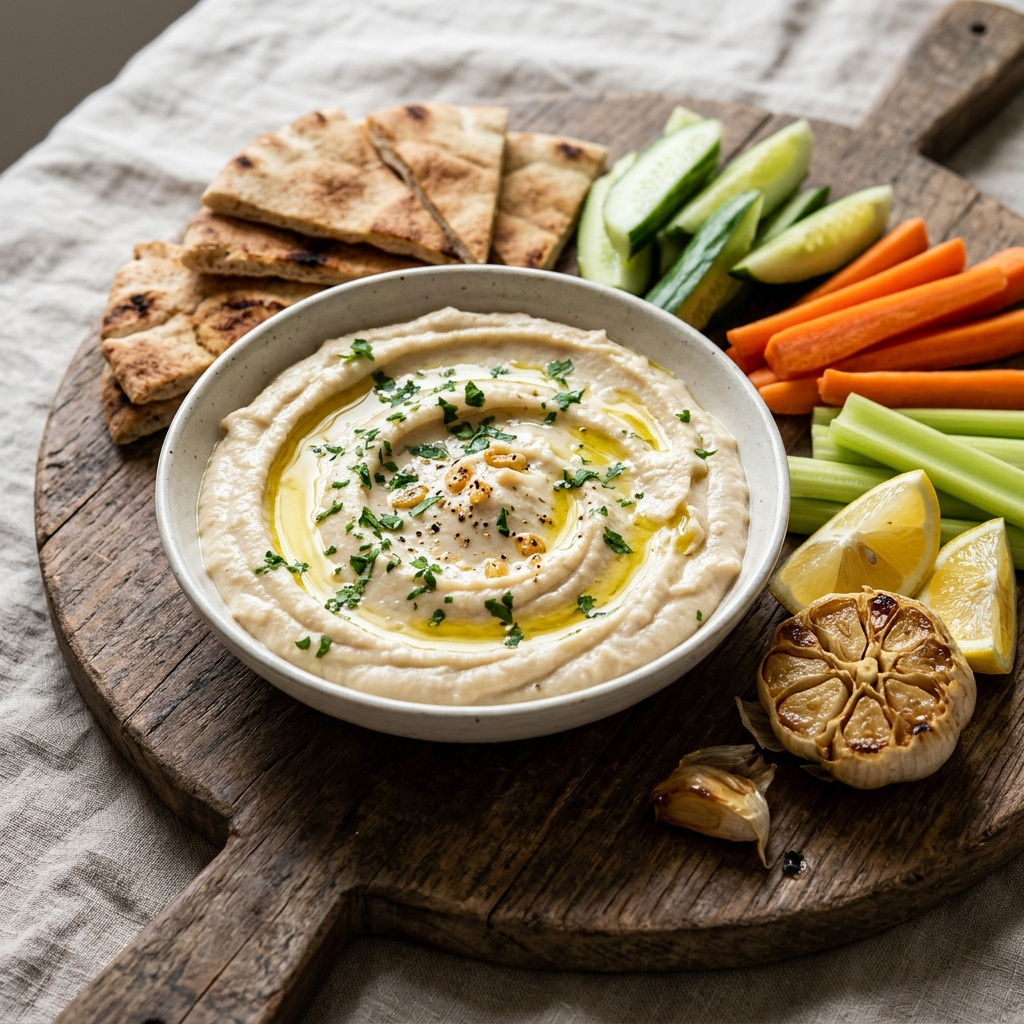
White Bean Dip with Roasted Garlic is a smooth, savory spread that feels a little special while using simple pantry ingredients. Roasting the garlic softens its sharpness and brings out a mellow, slightly sweet flavor that blends beautifully with creamy white beans.
This recipe is ideal for serving with crackers, toasted pita, or crisp vegetables, and it also works well as a sandwich spread or part of a snack board. A little lemon juice keeps the dip bright, while olive oil helps create a silky texture.
The method is straightforward: roast the garlic until tender, blend it with beans and seasonings, then adjust the texture to your liking. The result is a balanced dip that is rich without being heavy and easy to prepare ahead for gatherings or everyday snacking.
Recipe Overview
- Prep time: 10 minutes
- Cook time: 40 minutes
- Total time: 50 minutes
- Servings: 6 servings
- Difficulty: Easy
Why You’ll Love It
- The roasted garlic gives the dip a deep, mellow flavor without harsh raw garlic bite.
- It uses mostly pantry staples and a short ingredient list.
- The texture is creamy and spreadable, with easy adjustments for a thicker or looser finish.
- It works as an appetizer, snack, sandwich spread, or part of a mezze-style platter.
- It can be made ahead and chilled until ready to serve.
Nutritional Benefits and Adaptable Variations
- Cannellini beans create a very smooth dip, but great northern beans also work well.
- For a looser dip, blend in an extra 1 to 2 tablespoons of water or olive oil.
- For a more lemon-forward flavor, add an extra 1 tablespoon of lemon juice.
- A pinch of red pepper flakes can add gentle heat without changing the overall character of the dip.
- Top the finished dip with chopped parsley, extra olive oil, or a few whole beans for a simple variation in presentation.
Ingredients
- 1 whole garlic head
- 1 tablespoon olive oil for roasting the garlic
- 2 cans cannellini beans, 15 ounces each, drained and rinsed
- 3 tablespoons extra-virgin olive oil
- 2 tablespoons fresh lemon juice
- 1 teaspoon lemon zest
- 1/2 teaspoon kosher salt
- 1/4 teaspoon ground black pepper
- 2 to 4 tablespoons water
- 1 tablespoon chopped fresh parsley for garnish
- 1 teaspoon extra-virgin olive oil for garnish
Step-by-Step Instructions

- Preheat the oven to 400°F. Slice about 1/4 inch off the top of the garlic head to expose the cloves, place it on a small piece of foil, drizzle with 1 tablespoon olive oil, wrap loosely, and set it on a small baking dish or directly on the oven rack.
- Roast the garlic for 35 to 40 minutes, until the cloves are very soft and lightly golden. Remove it from the oven and let it cool for about 10 minutes, until comfortable to handle.
- Squeeze the roasted garlic cloves into the bowl of a food processor, discarding the papery skins. Add the drained and rinsed cannellini beans, 3 tablespoons extra-virgin olive oil, lemon juice, lemon zest, kosher salt, and black pepper.
- Process the mixture until mostly smooth, then add 2 tablespoons water and continue blending. Stop and scrape down the sides as needed so the dip blends evenly.
- Blend again until the dip is creamy and smooth. If it seems too thick, add the remaining water 1 tablespoon at a time until it reaches your preferred consistency.
- Taste the dip and adjust if needed with a little more salt or lemon juice. Spoon it into a serving bowl and use the back of a spoon to create a shallow swirl on top.
- Drizzle the top with 1 teaspoon extra-virgin olive oil and sprinkle with chopped parsley. Serve right away with crackers, toasted pita, or fresh vegetables, or chill until ready to serve.
Tips, Serving Suggestions & Substitutions
- Rinsing the beans well helps the dip taste cleaner and less starchy.
- Let the roasted garlic cool slightly before squeezing so it is easier and safer to handle.
- A food processor gives the smoothest texture, but a high-speed blender also works if needed.
- Add water gradually so you can control the final consistency.
- For the best flavor, let the dip sit for 15 to 20 minutes before serving if time allows.
Nutrition Information
| Per Serving | Approximate Amount |
|---|---|
| Calories | 187 kcal |
| Carbohydrates | 21 g |
| Protein | 7 g |
| Fat | 9 g |
| Saturated Fat | 1 g |
| Cholesterol | 0 mg |
| Sodium | 356 mg |
| Fiber | 6 g |
| Sugar | 1 g |
Nutrition is an approximate estimate per serving based on 6 servings and can vary depending on the specific canned beans and salt used.
Storage & Make-Ahead Tips
Store the dip in an airtight container in the refrigerator for up to 4 days.
If the dip thickens after chilling, stir in 1 to 2 teaspoons of water or olive oil before serving.
For best texture and flavor, garnish with fresh parsley and the final olive oil drizzle just before serving rather than before storing.
FAQ
1. Can I use a different type of white bean?
Yes. Great northern beans or navy beans can be used in place of cannellini beans. Cannellini beans usually give the creamiest texture, but the other options will still make a tasty dip.
2. Can I make this dip without a food processor?
Yes. A high-speed blender works well, though you may need a little extra water to help it blend smoothly. You can also mash everything by hand for a more rustic texture.
3. How do I make the dip thinner or thicker?
To thin it, blend in water or olive oil a little at a time. To make it thicker, use less added water or chill the dip for a short time before serving.
4. Can I make it ahead for a party?
Yes. Prepare the dip up to 1 day in advance and refrigerate it in an airtight container. Stir it before serving and add the garnish just before it goes on the table.
5. What should I serve with white bean dip?
It pairs well with toasted pita, crackers, cucumber slices, carrot sticks, celery, bell pepper strips, or as a spread for sandwiches and wraps.
Final Thoughts
This White Bean Dip with Roasted Garlic is a dependable recipe to keep in rotation when you want something easy, flavorful, and versatile. It comes together with familiar ingredients yet tastes polished enough for guests.
Serve it simply with vegetables and crackers, or build it into a larger spread with olives, warm flatbread, and crunchy toppings. However you present it, the creamy beans and sweet roasted garlic make a satisfying combination.
White Bean Dip with Roasted Garlic
Ingredients
- 1 whole garlic head
- 1 tablespoon olive oil for roasting the garlic
- 2 cans cannellini beans 15 ounces each, drained and rinsed
- 3 tablespoons extra-virgin olive oil
- 2 tablespoons fresh lemon juice
- 1 teaspoon lemon zest
- 1/2 teaspoon kosher salt
- 1/4 teaspoon ground black pepper
- 2 to 4 tablespoons water
- 1 tablespoon chopped fresh parsley for garnish
- 1 teaspoon extra-virgin olive oil for garnish
Instructions
- Preheat the oven to 400°F. Slice about 1/4 inch off the top of the garlic head to expose the cloves, place it on a small piece of foil, drizzle with 1 tablespoon olive oil, wrap loosely, and set it on a small baking dish or directly on the oven rack.
- Roast the garlic for 35 to 40 minutes, until the cloves are very soft and lightly golden. Remove it from the oven and let it cool for about 10 minutes, until comfortable to handle.
- Squeeze the roasted garlic cloves into the bowl of a food processor, discarding the papery skins. Add the drained and rinsed cannellini beans, 3 tablespoons extra-virgin olive oil, lemon juice, lemon zest, kosher salt, and black pepper.
- Process the mixture until mostly smooth, then add 2 tablespoons water and continue blending. Stop and scrape down the sides as needed so the dip blends evenly.
- Blend again until the dip is creamy and smooth. If it seems too thick, add the remaining water 1 tablespoon at a time until it reaches your preferred consistency.
- Taste the dip and adjust if needed with a little more salt or lemon juice. Spoon it into a serving bowl and use the back of a spoon to create a shallow swirl on top.
- Drizzle the top with 1 teaspoon extra-virgin olive oil and sprinkle with chopped parsley. Serve right away with crackers, toasted pita, or fresh vegetables, or chill until ready to serve.